Tuesday, July 31, 2012

Recipe: Shrimp in Vodka Sauce


I have a punishing workout regimen. Every day I do 3 minutes on a treadmill, then I lie down, drink a glass of vodka and smoke a cigarette. – Anthony Hopkins

This may very well be my favourite pasta sauce. Velvety, tomatoey and
delicious, especially with shrimp.
Alert! Alert! One pound (454 g) bags of large shrimp are on sale for $4.99 at the Atlantic Superstore (in Nova Scotia) from now until Thursday, August 2. Stock up – that’s $5 off their regular price.

I was almost certain that I had posted this recipe last year, but I’ll be darned if I can find it. Since it’s such a good one — and shrimp are ocean bottom price — I’m taking the risk and posting it now.

Vodka sauce for pasta is exactly what it sounds like – a pasta sauce made with vodka… a lot of vodka. 1/2 cup to be exact. Or at least my recipe takes that much. 

But this is not a substitute for a “liquid lunch.” The sauce has other ingredients too, so don’t worry too much…


Why vodka?
The vodka in the sauce enhances the favour of the tomatoes. Certain flavours are only alcohol-soluble which means you can’t taste them unless dissolved in alcohol.

Vodka is used because it doesn’t add other flavours to the sauce, like vermouth or brandy would do. So the end result is a more intense tomatoey flavour. San Marzano (the prince of Italian tomatoes) would be ideal, but the vodka can also improve lesser tomatoes as well.


Origins
The exact origins of pasta with vodka are muddy. The original dish was penne alla vodka and there have been multiple claims to the invention.

One source says it was invented in Bologna, Italy in a restaurant called Dante. Other culinary historians cite a man called James Doty, an American, for its invention.

Another claimant, Luigi Franzese of Naples, supposedly made the first version which he called penne alla Russe because of the vodka. It was served at his New York restaurant Orsini in the early 1970s.

The Williams Sonoma Essentials of Italian cookbook says that it was invented in the 1980s by a Roman chef for a vodka company that wanted to popularize its product in Italy.

What is known is that in the 1970s there was a push by vodka distillers to increase their market share in Italy. So who knows. It doesn’t really matter. This is one great sauce.


Can you get “sauced” by eating sauce?
Alcohol does not entirely burn off when cooking, regardless of what you may have read in other places. You would have to cook for a very long time to reduce the alcohol content to zero.

So any sauce that uses alcohol will retain some in the finished product. This sauce cooks very quickly so you will still have a lot of alcohol content in this.

I may post more on that subject later. It’s actually interesting. Or at least to me…


My recipe is different in a few ways from the “traditional” versions. Instead of tomatoes I use tomato paste. Also, there is always a spiciness to the sauce, most times chilli flakes. I use cayenne, but feel free to substitute.

Try this sauce. If you’ve never had it, you’ll be pleasantly surprised.

Mmmm...... that's all I can say. This is just before the shrimp go in.

Shrimp in Vodka Sauce
Prep: 10 min  |  Cook: 10-15 min |  Serves 4
1 lb large shrimp, peeled and deveined
1 tbsp olive oil
3 garlic cloves, chopped
1 medium onion, diced
1 cup vodka
1 cup whipping cream (32%)
2 tbsp tomato paste
1/2-3/4 tsp cayenne, to taste
1/4 cup parsley, chopped
6 basil leaves
salt and pepper
linguine for 4 people

Heat the olive oil in a wide flat saucepan. Sauté the garlic and onion for a few minutes until they soften slightly. 

Add the vodka, whipping cream and tomato paste. Bring to a boil and let cook until it reduces by about half.

Stir in the  cayenne, parsley and basil leaves. Then add the shrimp and let cook just until they are no longer pink, about 4 minutes.

Serve on linguine with crusty Italian bread.

.......................................

If you like this post retweet it using the link at top right, or share it using any of the links below. Questions? Comments? Derogatory remarks?

Monday, July 30, 2012

Old Recipe: Nova Scotia Smothered Steak


Don't smother each other. No one can grow in the shade. – Leo F. Buscaglia

Delicious, tender beef "smothered" in rich gravy.
This is another country recipe that I had all but forgotten about until my mother made it for me a few weeks ago.

It's called "smother." I have no real idea why it's named so, unless it's because the poor beef is smothered in gravy. It's a very old way of cooking beef, at least in Nova Scotia.

If you look online you get all kinds of smother recipes with all kinds of ingredients. Apparently smother in some parts of the southern USA is potatoes and onions, very similar to what we would call potato "hash."

There are also smothered beef liver recipes (sort of like this recipe), smothered pork, and an interesting sounding green chilli chicken smother that I may actually have to try.

But this recipe is for good old-fashioned Nova Scotia Smother: beef browned with onions and then "smothered" and simmered in gravy.

We used to have this fairly regularly when I was growing up. It was a great way to turn a less than wonderful cut of beef into a delicious meal. 

This is  "stick-to-your-ribs" kind of dish – the sort of thing that is great if you've put in a full day of yard work and want something hearty. It's an autumn sort of a meal.

I have seen a Cajun beef smother recipe, so there may be some sort of link with the Acadians in the Annapolis Valley of Nova Scotia. Nearly all were forced to leave their homes in Nova Scotia during the Expulsion of 1755-1763 and many settled in the areas around Louisiana – then still a French colony. The area didn't become part of the United States until 1803.

So it could very well be an early French method of preparing poorer quality cuts of meat. Regardless it's a safe bet to say it's a "settler" recipe.

I did make some revisions. I boosted the flavour of the gravy by adding Worcestershire sauce and dijon mustard. Feel free to omit them if you wish.

Regardless of this recipe's provenance it's a great meal and worthy of putting in your culinary repertoire.

I served it with potatoes, fresh peas and new carrots, all cooked together and tossed with butter and cream!


The gravy reduces and darkens slightly as it cooks.
Mother's Smother
Prep: 10 min  |  Cook: 30-40 min  |  Serves 4
1 tbsp oil or butter
1 medium onion, chopped
3 garlic cloves, chopped
2 lbs steak, cubed (simmering, cheaper cut)
1/4 cup flour
1 cup water*
1 beef bouillon cube*
1 tbsp  Worcestershire sauce
2 tsp Dijon mustard
salt and pepper to taste

Melt the oil or butter in a pan with a decent lid. Sauté the onion and garlic until soft. Then add the beef and cook until no longer brown on the outside.

Sprinkle the beef and onions with the flour and toss well. Let cook for about 1 minute.

Add the beef and bouillon cube and bring to a simmer. The sauce will thicken almost instantly. Add the worcestershire and mustard. Sprinkle with some cracked black pepper and salt to taste.

Cover and simmer on low for 30-40 minutes.

* You can also substitute 1 cup of beef broth for these two ingredients.

.......................................

If you like this post retweet it using the link at top right, or share it using any of the links below. Questions? Comments? Derogatory remarks?

Sunday, July 29, 2012

Recipe: Ciabatta (Slipper) Bread


Do not trust your memory; it is a net full of holes; the most beautiful prizes slip through it. – Georges Duhamel 

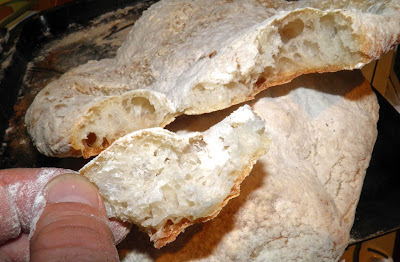
Holes! I made holes!!
(Or did I make the bread around the holes... I hate philosophical questions.)
Fresh Italian ciabatta in 4-5 hours? Yes. So you have no excuse for not having really good bread for dinner this evening – even if you start it at noon.

Step one. All ingredients combined.
Ciabatta bread is a type of Italian white bread. The name means “slipper”, because its baked shape supposedly resembles a slipper. I suppose it does if you wear rectangular shoes...

My recipe is based on one originally posted on usenet in alt.bread.recipes by Jason Molina, and reposted (in homage I believe) onto The Fresh Loaf. If you’ve never been to thefreshloaf.com go now.

Actually finish reading my post and then go. It’s a must see – an amazing, amazing site if you’re interested in bread at all.

You don’t have to pre-proof yeast for this so to be safe use new yeast. It also relies on a mixer with a dough hook to knead it. There’s no way you could with your hands. It’s too wet a dough. The 15 minutes kneading with the machine is what is responsible for all the beautiful holes in the bread.

This is really good although I had hills and valleys in the final loaves. That was my fault, not the recipe. I made my loaves too wide and flat. The directions in the recipe have been corrected.

Step 2: kneading with a dough hook.
My shaping skills will get better as I make more of this – and I will. It is slightly sweet and moist inside with a firm crust. It was wonderful dipped in balsamic and oil.

This recipe is only a fraction of the work of a normal ciabatta recipe, as far as shaping goes. It does not use the traditional stretch/fold method for forming the loaves. You couldn’t because the dough is so wet. The only shaping happens just before baking.

One of the most common uses for ciabatta bread is for the pressed, grilled Italian sandwich called panini. This bread works well for pressed sandwiches because its texture can hold up to being pressed without becoming soggy or falling apart.

Another common use is for antipasti. The bread is dipped into olive oil mixed with chopped herbs or balsamic vinegar.

This recipe can easily be doubled, but you'll need a big bowl to let it rise.

This is the resulting dough after kneading.
This is what the dough will look like after rising.
It went right to the top of the KitchenAid bowl
Close-up. It looks more like a bowl of biga starter than bread.


Half of the dough, resting for 45 minutes.
Ciabatta (Slipper) Bread
Time: 4-5 hours  |  2 loaves
3 cups
2 cups water
2 tsp yeast
1-3/4 tsp salt

Get out your KitchenAid mixer. Beat all the ingredients together with the paddle attachment. Let the dough rest for 10 minutes, then knead on medium speed for 15 minutes with a dough hook.

Cover the dough with plastic wrap nd a tea towel. Let rise until tripled in a warm place(about 2-3 hours). In summer the best place is outside.

Flour a work surface liberally. Scoop out the dough onto the work surface and cut it in two. Then place each piece on a cookie sheet that also has been liberally sprinkled with flour.

After resting. Nicely puffed.
Flour the tops. Let the loaves rest for 45 minutes. While they rest preheat the oven to 485°F.

At the end of the 45 minutes gently stretch each piece into a 6x8 rectangle. Flip each piece over and flour the top again. Flipping redistributes the air holes.

Bake for 16-20 minutes turning at the halfway point so the top bread is on the bottom rack and the bottom read is on the top; AND the edge of the bread facing the front of the oven is is now facing back. (This gives even cooking to each loaf if your oven heat is uneven – like most ovens are.)

Cool and serve.

I flattened mine into a 10x12. It was too much. 6x8 will do nicely.

.......................................

If you like this post retweet it using the link at top right, or share it using any of the links below. Questions? Comments? Derogatory remarks?

Saturday, July 28, 2012

Foraging: Beach Peas (Lathyrus japonicus var. maritimus)


We ourselves feel that what we are doing is just a drop in the ocean. But the ocean would be less because of that missing drop. – Mother Teresa

That's a Canadian penny next to the peas. They're tiny, but perfect  looking.
I don’t usually start off with a warning but this time I will. I have found many, many sources that cite historical uses of beach peas as a food source. I have also found the seeds of beach peas (grouped in the family of garden “sweet peas”) contain a toxic amino-acid.

A mass of beach pea on the shore of a local beach in Nova Scotia. You can just see
my spouse and Henry the Bouvier in the waves (top left).
This amino acid—in large quantities—can cause a very serious disease of the nervous system known as Lathyrism. I would assume it is present in all members of the genus Lathyrus because the condition’s name is so like the plant name.

The seed is said to be perfectly safe and very nutritious in small quantities, but should not comprise more than 30% of the diet. So as another blogger wrote, if you’re marooned on a desert island watch out how much you eat.

But now on to the plant...

Beach pea in bloom. It's quite attractive.
Photo: Anita 363, Flickr ccl
If you’ve been to a beach in the northern hemisphere anywhere in the world you’ve most likely seen this. Beach pea is a perennial coastal plant that grows in the sand dunes and gravelly areas of beaches. 

The species that grows here is “var. maritimus.” There are many others that appear worldwide.

Beach pea looks very much like either vegetable peas and/or garden sweet peas except “hardier.” By that I mean tougher looking, I assume to stand up to coastal conditions. It is hardy to USDA Zone 3. That’s pretty hardy.

Bech peas can reach about 2 feet in length. The leaves are oval, arranged in pairs and terminate with a tendril. The flower is a raceme with 5-12 blue-violet flowers. 

If you’ve ever seen a sweet pea (or vegetable pea) you know what they look like. Flowers appear in July through September in Nova Scotia. 

The fruit is a typical legume, with 2 halves that split open  but remain hinged at the base. Inside you will find pea seeds arranged in a row. They are quite tiny in relation to vegetable peas. 

The seeds ripen from late July through to October. If you want to eat the peas you have to pick earlier (when they’re immature) rather than later as they toughen as they mature. If you want to grow it in your garden, you have to let the seeds fully mature.

The pea pods
Beach peas are pollinated by bees and butterflies. The plants help in fixing nitrogen in the coastal soil. In Canada beach pea can be found in British Columbia and from Manitoba to Newfoundland. 

Beach peas can be successfully grown in the garden in well drained soil and full sun. They cannot tolerate shade.

Here’s uses I found for beach pea. Remember the warning at the top of the post...

The immature peas themselves can be cooked like garden peas. The mature seeds can be sprouted and eaten. The pods can be stir-fried whole and the tendrils can be harvested as a “gourmet” treat. Pea tendrils are quite a fad right now in many gourmet food magazines. They are often tossed in with salads.

You can also eat the plants when young, either raw or cooked. The mature dried seeds can be roasted for a coffee substitute. With the price of coffee now I may be trying that one...

The Chinese used beach peas as a tonic for the urinary organs and intestinal tract. Iroquois treated rheumatism with cooked whole young plant. Of course, never try to treat yourself with wild edibles.

So if you can get past the fear of lathyrism it may be well worth a nibble the next time you go to the beach. Just for fun...

I certainly wouldn’t want to have to shell enough of these small green darlings for a meal. So poisoning my family is almost certainly not going to happen – at least not by beach peas...


.......................................

If you like this post retweet it using the link at top right, or share it using any of the links below. Questions? Comments? Derogatory remarks?
Friday, July 27, 2012

Water Gardening: Nymphaea Odorata


Wealth, the beauty of youth and flowers are guests for only a few days. Like the leaves of the water-lily, they wither and fade and finally die. – Sri Guru Granth Sahib

Stunning white floating beauties.
The time of summer is now upon us when waterlilies are in bloom. There is not much more magical than canoeing in early morning through the mist and coming upon a colony of these white, ethereal beauties.

I can remember like yesterday one such occasion when I was canoeing on the lake where I grew up. I was quite small at the time and it really made an impact.

These were close enough to shore for me to photograph!
Water lily flowers are extremely showy and fragrant but each bloom only lasts a few days. It’s a shame that most of us (those without boats) can only admire them from afar, as they are even more beautiful when seen up close.

Nymphaea odorata blooms are about 5-6” across and almost pure white. Some flowers are pink here in Nova Scotia, although in the wild they are rare. The blossoms and oval leaves float on the surface of the water on stems that are slightly longer than needed to reach the bottom of where they grow.

The underside of the leaves, often anywhere from 4 to 8 inches long, are purple on the underside. Because they grow in the water the stems of both flowers and leaves are usually “slimy.”

Different Nymphaea species grow world wide and are present from temperate regions through to the tropics, both north and south.

Nymphaea have an unusual way of becoming pollinated. When the blooms open they excrete a little fluid that collects at the bottom of the flower. When insects visit the flower they are directed past the pollen and down to the base. 

The pollen “washes” off them when they are in the fluid. Most often the insect escapes, although some do get stuck and drown.

After the blossom is pollinated the stem tightens and draws the bloom underwater where the berries develop. When ripe, up to 2,000 seeds are released from each berry. The seeds float and are dispersed by currents or aquatic life. They then become waterlogged, sink and sprout.

Waterlily is not without its “culinary” uses. Native Americans made flour out of dried roots. The young leaves and flower buds were eaten as vegetables and the seeds eaten toasted.

Natives also used the plant medicinally. Mashed green roots were used as poultice for swollen limbs; the roots for problems of the womb, digestive problems, a rinse for mouth sores; leaves and flowers as cooling compresses.

If you have a water feature you can purchase many varieties of waterlily in local garden centres. Lots of different colours are available from which to choose.

But I do have to admit that nothing is as stunning as gliding through hundreds of blooms in the morning mist.

.......................................

If you like this post retweet it using the link at top right, or share it using any of the links below. Questions? Comments? Derogatory remarks?

Thursday, July 26, 2012

Recipe: Tuscan Eggplant Sandwich


A man can live and be healthy without killing animals for food; therefore, if he eats meat, he participates in taking animal life merely for the sake of his appetite. And to act so is immoral. – Leo Tolstoy

There's a lot going on in the sandwich.
Can sandwich filling be “filling” if it doesn’t contain meat? That’s a common complaint about many vegetarian dishes. People often say that they feel hungry far sooner than when they have meat as part of their meal.

Well that doesn’t have to be the case. This sandwich proves my point. Nothing with “a face” was harmed in the creation of this wonderful sandwich.

Frying eggplant imparts a smoky flavour.
Layers of fried eggplant nestle between fried bread sprinkled with tart, fruity balsamic vinegar, with cheese, tomatoes, roasted red peppers, basil… As you can see, the flavours in this just keep building and building.

By the way, not all balsamic vinegar is created equal. The better quality your vinegar the better your sandwich will be. It really makes a difference.

If you’ve never had oil and balsamic as an appetizer at an Italian restaurant try it. It's in something a simple as this where good quality ingredients really shone.

Mix some extra virgin olive oil with some balsamic in a flat dish. Dip fresh crusty Italian bread in it and enjoy. It’s amazing, and addictive.

I had to paint a room last night (about 3 hours) – we’re soooo close to getting the house on the market it’s pathetic – so I needed something fast, nutritious and delicious for dinner. It’s pretty easy to find a wide range of recipes to choose from on the Web if your search parameters are clear.

This recipe is based on one I found on medicinenet.com. My google search parameters were “fast healthy recipe”. Simple, eh? This meets all three.


Nothing boosts the flavour of a sandwich like a whole
layer of basil.
Tuscan Eggplant Sandwich
Prep: 15-20 min  |  Serves 4
1 9x9 ciabatta bread, or similar Italian
olive oil
balsamic vinegar
1 large eggplant
2 roasted red peppers
200g grated mozzarella
2 medium tomatoes, sliced
basil leaves
arugula greens, or other greens
salt and pepper

Lay out some paper or other surface to assemble the sandwich. It’s a messy venture.

Slice the ciabatta in half and brush with some olive oil. Brown the faces of the bread in a very hot frying pan. Remove to the prep surface and sprinkle with some balsamic vinegar.

Slice the eggplant into 1/2 inch thick rounds. Season with salt and pepper. Add some olive oil to the pan and fry both sides until well browned.

When I say eat your greens I obviously mean it...
Then start to assemble the sandwich, while the eggplant is still warm so it melts the cheese, in this order:
1. one layer of greens on the bottom piece of bread
2. half of the eggplant slices
3. half of the grated mozzarella
4. the roasted red peppers
5. remaining eggplant slices
6. remaining mozzarella
7. a layer of basil leaves
8. the tomato slices
9. salt and pepper to taste
10. some more greens
11. sprinkle liberally with balsamic vinegar.

Close up the sandwich, press down and cut into four equal pieces.

This sandwich is a quick way to put a fairly nutritious meal on the table in a short amount of time. 

.......................................

If you like this post retweet it using the link at top right, or share it using any of the links below. Questions? Comments? Derogatory remarks?

Wednesday, July 25, 2012

Illustrated Guide: Homemade Hamburger Buns


If it's flipping hamburgers at McDonald's, be the best hamburger flipper in the world. Whatever it is you do you have to master your craft. – Snoop Dogg 

Homemade hamburger buns. The burger is beef combined with sautéed portobello,
red onion and cubed provolone cheese. It is topped with fried pancetta and basil mayonnaise.
Here's another "illustrated guide, how-to" for you all. It's Wednesday, so the weekend will be upon us before we know it.

As far as I know the weather will cooperate here in Nova Scotia and if so many of us will be grilling. Why not try homemade hamburger buns? They're really easy.

I posted about homemade hot dog/hamburger buns earlier (here), but they took a sourdough starter. The drawback was extra time, the benefit that they kept fresh a little longer… Bread without a starter usually goes stale in 24-48 hours. Case in point, French baguettes – mad fresh every day – and delicious.

These buns can be done in one day – even one morning or afternoon. So no need to pre-plan if you're a "spur of the moment" type of person.

As far as yield, if you cut the dough into 8 portions you get larger sized buns. 12 portions will yield "normal" sized buns. Therefore it's easy to use this same recipe for crowds of different sizes.

So without further ado, here's the "illustrated how to":

After the first rise. It's very bubbly and sticks to the sides. The indent
on the top is from my finger testing it. It is not at all a "firm" stiff dough.

Homemade Hamburger Buns
Prep: 15 min  |  1st Rise: 2 hours  |  2nd Rise: 30 min  |  Bake 20-25 min  |  Yield 8-12 buns
1 tbsp yeast
1 cup milk
1/2 cup water
3 tbsp butter
1 egg
3-1/2 cups white flour
1 tsp salt
butter for rubbing the buns

Left: half the dough divided into balls; right: piece remaining to be cut.
I'm making 8 buns.

To make the buns of equal size divide the dough in half (visually) and roll
each portion into a ball. From there it is fairly easy to cut into 4 or 6, depending on
if you're making 8 or 12 buns. Each ball is flattened into a round for the second rise.
Warm the milk, water and butter on the stove to between 110°F and 115°F. Use a thermometer. Any hotter and the liquid will kill the yeast, and any lower temperature will slow down the activation time.

Proof the yeast in the warm liquid for 15 minutes. If it's creamy it's "good to go", if not start again as there may be something wrong with your yeast. Always ensure your yeast is fresh before you start. (It doesn't last forever in your cupboard.)

Ready to go into the oven. The tops have been slightly dimpled with my fingertips.
This helps the buns go "out" as opposed to "up". We don't want balls for buns.
Whisk the egg into the proofed yeast mixture. Add about 3-1/2 cups of flour. You want a very  moist, somewhat sticky dough. (The moisture content in flour can vary from day to day, so some days it will take more, some days less..)

Knead briefly, for about 1 minute to bring it all together. Place the dough back in the bowl. Cover with plastic wrap and a tea towel.

Let rise in the warmth (like outside in 85° sunshine…) for 2 hours, until doubled in book. Mine actually formed gas bubbles on the surface.

Finished buns, glistening with butter. Mmmmmm.......
Grease a cookie sheet(s) with butter and divide the dough into 8 or 12 equal balls.

Place each ball on the sheet and flatten out. Let them rise for 30 minutes. Dimple the dough slightly with your fingertips just before placing in the oven.

Bake at 400°F for 20-25 minutes. I found the lower time worked fine. 

Rub the tops with butter to keep them soft. If you want crustier buns, omit this step.

Et, voila! Homemade hamburger buns – perfect for your gourmet-style hamburgers.

.......................................

If you like this post retweet it using the link at top right, or share it using any of the links below. Questions? Comments? Derogatory remarks?

Tuesday, July 24, 2012

Native Ornamental Plant: Button Bush


A tree is known by its fruit; a man by his deeds. A good deed is never lost; he who sows courtesy reaps friendship, and he who plants kindness gathers love. – Saint Basil 

One of the more interesting flowers I have ever seen.
Today's post definitely falls into the category of "looking but not seeing." I have walked, biked and/or driven past this bush literally thousands of times. I've even stood next to it and fished… But I never noticed it until this past weekend when I walked past with Henry.

Happily sitting with its feet in the water. This group is about
6 feet tall and 12 feet wide
It is odd, because it really stands out. It's called the Button Bush, for obvious reasons. The flowers are something that you can't not notice. I have no idea why it took so long for me to clue in.

Button bush (Cephalanthus occidentals) is a flowering plant in the coffee family, Rubiaceae, believe it or not. Other names include Button Willow and Honey Bells.

Button bush is a very attractive, old ornamental suited to wetter areas in the garden. It was often "rescued" from the wild by our ancestors and moved into homestead gardens, much as I am going to try. 

These bushes are loved by wildlife. The flowers are used by bees to produce honey, and ducks and other birds eat the seeds.

Button bush likes to have wet feet. It likes to grow on river banks that often become flooded for part of the year. It can grow 5 feet high and 10 feet wide, at least in Nova Scotia. I have read smaller sizes but I was actually looking at the plant, so my sizing is indisputable. 

The flowers are unusual, to say the least. Blooming mid-summer in multiples on the end of new stalks, they are completely round, spiky and fragrant. See the photo above.

The leaves are arranged in pairs on the stem.
The leaves are glossy and pointed, and are quite attractive on their own. In fall the bush turns yellow, before the leaves drop off.

In settlers times the bark was sometimes used in folk medicines. Current science casts doubt on its usefulness, because it contains a toxin.

Some native tribes did use the bark as an emetic to induce vomiting. In high doses it can cause convulsions, paralysis and even death. So best not to use the bark, I would venture.

Old fashioned plants are becoming more and more popular lately. Interestingly, they are often native. Button bush in particular attracts butterflies, birds and other wildlife and are easy to grow.  

Because of its tolerance of wet It can be used in areas of a yard where other plants would die. They can help control erosion on river banks and give habitat to wildlife and food to butterflies and birds. 

There was a part of this growing close-by in a much drier spot.
That's where I'm going digging.
If you're like me, and you find one in the wild, you'll start looking around the base for stems that can be dug up. I know  have my eye on a few where I found this bush.

.......................................

If you like this post retweet it using the link at top right, or share it using any of the links below. Questions? Comments? Derogatory remarks?

Monday, July 23, 2012

Boozing: Hay-Scented Vodka


Ah, that I were free again! Free as when I rode that day, Where the barefoot maiden raked the hay. – John Greenleaf Whittier

Timothy grass vodka. Green goes in, amber comes out. Go figure...
Here’s a quickie post. I’m writing before starting work and my list of duties I have to perform today is as long as an elephant’s nose. Maybe even two elephants.

Timothy grass. This is the amount I used.
The hay fields have been given their first cut and the hay is drying waiting to be baled and brought into the barn. Does anyone else love that smell? If so you may very well be interested in this vodka. 

This is a hay-flavoured vodka. Now before you think I’ve lost my mind, I had a Polish vodka many years ago that was flavoured with buffalo grass –or at least what they called buffalo grass. I’d never heard of it before. 

The vodka was served ice-cold and as shots. It was also crystal clear, but I don’t have re-distillation processes in place to clarify my homemade hooch. My infused vodkas are “all natural,” meaning usually darker coloured than if commercially produced.

I may not have heard of buffalo grass, but I am familiar with timothy grass, a major constituent of hay on the East Coast of North America.

When we were young we used to pick a stalk and chew on the timothy grass. I still do it. Picture a “hay-seed” hick–highly insulting I know–with a piece of grass sticking out of his mouth.That’s timothy grass, most likely.

Timothy grass is a perennial grass native to most of Europe. It is believed to be an unintentional introduction on this side of the Atlantic, first being reported growing in New Hampshire in 1711. It soon became used as a hay crop.

Timothy grass is a staple for many of the animals we raise as pets (guinea pigs, rabbits) as well as those we raise to eat, so it won’t kill you to instill vodka with its flavour. Or should I say "it is safe to use for infusing vodka"...

If you want an unusual martini or interesting chilled shots look no further. The taste is unlike anything else.

Timothy grass pollen is an allergen to some people so I only used the stalks and blades of grass. I have it chilling in the refrigerator right now. If used as shots, put it in the freezer to get a little syrupy.


Timothy Grass Vodka
Time: 1 to 2 weeks
375 ml good quality vodka
1 Mason jar
1 handful of timothy grass stalks

Make sure you harvest your grass in an unpolluted spot. It’s also best to was it to get any airborne dust from the grass.

Remove the heads and chop the remaining grass into 2-4 inch lengths. Place in the jar and pour the vodka over the top. Seal.

Shake every day for 1 to 2 weeks. The infusion time is up to you.

Strain, chill and serve.

If giving as gifts, place a blade of grass in the bottle with the vodka, but make sure it is completely submerged or it will decay.

.......................................

If you like this post retweet it using the link at top right, or share it using any of the links below. Questions? Comments? Derogatory remarks?